Well folks, the annual bash is here again. We start up tomorrow (Thursday) morning with set-up, registrations and check-in starts at 1:00 PM. Again we have a big line-up of presenters but this year we also have workshops and ride-outs. Myself, I will be doing workshops on electrical basics, bearings and DIY modifications, using the DR800 as my prop and demonstration tool. Hopefully I will be able to post photos up as the event progress. Last time I checked we had about 105 on-line pre-registrations, so the numbers are looking good. The venue is "The Outlook" a Queensland Government owned site with camping and dorm-type accommodation as well. Most importantly it has fully set-up conference and options for wet weather. So fingers crossed for an excellent three days of motorcycle travel mayhem.
DIY Stuff: Puncture repair and rear wheel bearings
Today I had a few small jobs to do including fixing a flat tyre. As this involves taking the wheel off, I thought I would try doing the rear wheel bearings and also try doing both jobs using as much as possible the tools and techniques that I would be using if on a trip. A bit of practice should I ever need to do these jobs, or ones like them away from home.
First some preparation. I ordered the replacement bearings and seals from Brisbane Motorcycles at Caboolture. I had tried to order some aftermarket bearings but these were not that easy to source, so OEM it was. I was pretty pleased how that turned out because from what I have read on various forums, the genuine Suzuki bearings are fairly good. To work out which bearings, and a seal, to order, I used the parts breakdown from CMSNL.COM.First step after unpacking was to see if they bearings come with any grease, which they do. However, it really is enough grease to protect the steel whilst in storage and transit and it is wise to pack the bearings with an appropriate waterprrof grease.


So packed them nice and full with Castrol Boating Grease, which I suspect is the same as Belray Motorcycle Waterproof Grease. Looks and feels the same and the information from Castrol is that it is suitable for axles and wheel bearings exposed to water. Taking time to push the grease in and pack as much as possible should help the bearings last. After packing the grease it was back into the packaging and into the freezer. If left long enough this shrinks the races enough to make them small enough to drop in. In this case, after two hours in the freezer, they did not just drop in but neither did they require ay significant force. The front wheel bearings will be in the freezer for several weeks.
These next few pictures show my attempt to do the repair without the bike lift or a centre stand, just like being on the trail. Although instead of a pink plastic box, I may require a rock, a log or try using the cut down walking stick prop stand. Anyhow, the balancing on the side stand trick does work.


In this photo I'm trying to show the important of keeping your axle, washers, spacers and nut together and clean. A friend of mine recently allowed a bunch of dirt on one of the spacers and it ground away.

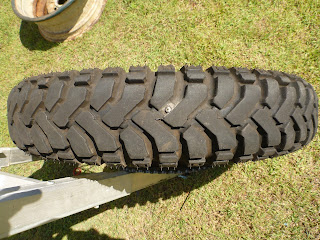
Here you can see the screw that puncture the tyre and tube. Its about an inch, 2.5 centimetres long.
 Both jobs went well and a couple of pertinent points:
1. The "Slime" brand pump was sufficient to pump up the tyre. The exact model pump is now longer available but the equivalent of today's product line-up is the Slime Tyre Inflator. The Slime brand is very affordable.
2. Using the Yamalube tyre lube was a large part of making the bead pop easily. I can't carry that with me on the bike, its a full size 300ml aerosol can. I have ordered a small container of DRC bead cream from bikebiz.com.au and hopefully that is as good.
3. I used the old trick of re-useable cable ties to keep the sprocket carrier to the hub when needed. It really helps. Of course tye sprokect carrier and cush drive rubbers where removed when replacing the bearings.
4. I made a mistake when trying to knock the old bearings out. The easy way is to place the wheel cush drive side down and knock that bearing out by using a lever (in this case a very old screwdriver) from the disk brake side. Once that side is out, turn the wheel over and knock the other side out. I used a 20 cm 1/2 inch socket driver extension as a drift.
5. Be sure to have the correct size drift or socket to bang in the new bearings. No need to have the bearings hard against the spacers. Tighten the axle after putting the wheel back on will bring the bearings in nice and smooth.
6. Plenty of grease where grease is meant to be and everything else shoudl be clean. Grease and dirt can become a form of grinding paste and of course mating surfaces such as between a bearing outer race and a hub are not meant to turn; that will cause premature wear and tear.
So today was a good day. Practice on some old skills, testing out some new techniques and ideas I have tried before which in turn builds my confidence for travelling further afield.
First some preparation. I ordered the replacement bearings and seals from Brisbane Motorcycles at Caboolture. I had tried to order some aftermarket bearings but these were not that easy to source, so OEM it was. I was pretty pleased how that turned out because from what I have read on various forums, the genuine Suzuki bearings are fairly good. To work out which bearings, and a seal, to order, I used the parts breakdown from CMSNL.COM.First step after unpacking was to see if they bearings come with any grease, which they do. However, it really is enough grease to protect the steel whilst in storage and transit and it is wise to pack the bearings with an appropriate waterprrof grease.


So packed them nice and full with Castrol Boating Grease, which I suspect is the same as Belray Motorcycle Waterproof Grease. Looks and feels the same and the information from Castrol is that it is suitable for axles and wheel bearings exposed to water. Taking time to push the grease in and pack as much as possible should help the bearings last. After packing the grease it was back into the packaging and into the freezer. If left long enough this shrinks the races enough to make them small enough to drop in. In this case, after two hours in the freezer, they did not just drop in but neither did they require ay significant force. The front wheel bearings will be in the freezer for several weeks.
These next few pictures show my attempt to do the repair without the bike lift or a centre stand, just like being on the trail. Although instead of a pink plastic box, I may require a rock, a log or try using the cut down walking stick prop stand. Anyhow, the balancing on the side stand trick does work.


In this photo I'm trying to show the important of keeping your axle, washers, spacers and nut together and clean. A friend of mine recently allowed a bunch of dirt on one of the spacers and it ground away.

Here you can see the screw that puncture the tyre and tube. Its about an inch, 2.5 centimetres long.


1. The "Slime" brand pump was sufficient to pump up the tyre. The exact model pump is now longer available but the equivalent of today's product line-up is the Slime Tyre Inflator. The Slime brand is very affordable.
2. Using the Yamalube tyre lube was a large part of making the bead pop easily. I can't carry that with me on the bike, its a full size 300ml aerosol can. I have ordered a small container of DRC bead cream from bikebiz.com.au and hopefully that is as good.
3. I used the old trick of re-useable cable ties to keep the sprocket carrier to the hub when needed. It really helps. Of course tye sprokect carrier and cush drive rubbers where removed when replacing the bearings.
4. I made a mistake when trying to knock the old bearings out. The easy way is to place the wheel cush drive side down and knock that bearing out by using a lever (in this case a very old screwdriver) from the disk brake side. Once that side is out, turn the wheel over and knock the other side out. I used a 20 cm 1/2 inch socket driver extension as a drift.
5. Be sure to have the correct size drift or socket to bang in the new bearings. No need to have the bearings hard against the spacers. Tighten the axle after putting the wheel back on will bring the bearings in nice and smooth.
6. Plenty of grease where grease is meant to be and everything else shoudl be clean. Grease and dirt can become a form of grinding paste and of course mating surfaces such as between a bearing outer race and a hub are not meant to turn; that will cause premature wear and tear.
So today was a good day. Practice on some old skills, testing out some new techniques and ideas I have tried before which in turn builds my confidence for travelling further afield.
Subscribe to:
Posts (Atom)