This footage was shot earlier in the day. The trails have a great variety of terrain, with a bit of mud thrown in as well. Between the weight of the bike (and rider) and my (lower) skill level, I was a lot slower on these trails.
Saturday 7 November 2015. Jimna State Forest and surrounds
After a bit of a false start, I met up with David (Tenere 660) and Craig (DR650) at Woodford. We had planned to meet at Dayboro however the road in from Petrie was closed and so we had a few quick phone calls and away we went.
There was no real plan other than to head north and explore, so we went along Neurem Road to just shy of Kilcoy, into Kilcoy and then onto Jimna. The area is just full of dualsport options from muddy and snotty technical tracks that are more suited to smaller and lighter bikes to wide open forestry and fire trails that you can enjoy on the larger bikes as well.
The stop at the Jimna Information Centre was very helpful. We met one of the locals, Dave, who talked us through the maps of the various tracks. They have on sale topographic maps that cover the whole area for $15.00 each. You need four different maps to cover the whole area in enough details and it is cash only, so I will be sure to bring enough cash and a large enough container to keep them safe next time.
In the morning, the tracks were a real combination and probably much more suited to the borrowed DRZ400 I will take next time. I had a bit of a moment through some downhill mud but recovered with nothing more than a minor fright and a reminder to keep concentration levels up. Later in the day the trails opened up nicely. No matter what the conditions where though, it was all good fun. Here's a video of the last ten minutes and I hope to have a few more up over the next week or so:
Avid readers will notice that I have made yet another change to the front cowl. This is a three-part cowl that works really well, it is very functional but I really need to improve on the heating and bending process to make it look good. As pictured, it is running without a windscreen, which is a must for riding through farming areas. When without a windscreen, the wind flows directly into my eyeline and the helmet visor provides plenty of evidence of this. Nonetheless, I am certain I have the dimensions and angles down to exactly where they need to be. Earlier today I added the clear acyrlic windscreen that should not pop the air flow right over the top of my helmet, making a very comfortable ride.
Another important change is the rear suspension preload. I added about 11 millimetres of preload on Friday to stop the rear from bottoming out, It was also pretty poor through corrugations. I think I lucked out as the bike certainly performed better both on road and especially off road and a check of the mud underneath confirms that there is no more bottoming out. The ride height has increased slightly but now I am quite comfortable, finally, with the extra height and the clearance gained will be helpful when off road as well.
It was really interesting to look over Craig's and David's bikes. Both are setup very well with Craig using a ruggedized 8 inch Android tablet as a GPS and David's DIY racks are very impressive. Plenty to see and take onboard from both bikes.
There was no real plan other than to head north and explore, so we went along Neurem Road to just shy of Kilcoy, into Kilcoy and then onto Jimna. The area is just full of dualsport options from muddy and snotty technical tracks that are more suited to smaller and lighter bikes to wide open forestry and fire trails that you can enjoy on the larger bikes as well.
The stop at the Jimna Information Centre was very helpful. We met one of the locals, Dave, who talked us through the maps of the various tracks. They have on sale topographic maps that cover the whole area for $15.00 each. You need four different maps to cover the whole area in enough details and it is cash only, so I will be sure to bring enough cash and a large enough container to keep them safe next time.
In the morning, the tracks were a real combination and probably much more suited to the borrowed DRZ400 I will take next time. I had a bit of a moment through some downhill mud but recovered with nothing more than a minor fright and a reminder to keep concentration levels up. Later in the day the trails opened up nicely. No matter what the conditions where though, it was all good fun. Here's a video of the last ten minutes and I hope to have a few more up over the next week or so:
Another important change is the rear suspension preload. I added about 11 millimetres of preload on Friday to stop the rear from bottoming out, It was also pretty poor through corrugations. I think I lucked out as the bike certainly performed better both on road and especially off road and a check of the mud underneath confirms that there is no more bottoming out. The ride height has increased slightly but now I am quite comfortable, finally, with the extra height and the clearance gained will be helpful when off road as well.
It was really interesting to look over Craig's and David's bikes. Both are setup very well with Craig using a ruggedized 8 inch Android tablet as a GPS and David's DIY racks are very impressive. Plenty to see and take onboard from both bikes.
Saturday 24 October 2015. Cross country through parts of the Lockyer Valley and Scenic Rim
Caught up with F800GS mounted Mark at his place at about 8:00 PM and the plan was, well, we didn't really have too much of a plan. We head out over Mount Glorious via the "Goat Track Road", video of which is below. From there, to the bottom of Mount Glorious, up to Somerset, left at the T intersection and down to the Esk-Crows Nest Road, which is just great. A quick bite at Crows Nest and then gravel roads at the back of Crows Nest, 17 mile road and down to the Scenic Rim. Here we dropped in at Ropeley Lutheran Church. This is an area settled by Mark's ancestors; his paternal great grandparents are interred there and there is a memorial to the three brothers who first migrated to the area. Quite a moment to be there with Mark.
Of to Laidley for some fuel and then down to the end of the road at Townson. The road was gated but I am not sure it really is private property and will have a look into this. Mark has been searching for years for a track over the range here. A reasonable quest I believe. A long day of about 10 hours riding. I guess you could deduct about two hours for stops at most. Anyhow, I hope you enjoy the short video of the Goat Track Road:
Of to Laidley for some fuel and then down to the end of the road at Townson. The road was gated but I am not sure it really is private property and will have a look into this. Mark has been searching for years for a track over the range here. A reasonable quest I believe. A long day of about 10 hours riding. I guess you could deduct about two hours for stops at most. Anyhow, I hope you enjoy the short video of the Goat Track Road:
Sunday 11 October 2015. V-Star needs some loving
Theold V-Star 650 has been languishing for a while. That's despite paying rego and insurance, I simply had to put it aside after a failure to finish the bulk of my studies for the year. The second term finished on Friday and this afternoon I started work on the VStar, also known as the Rainmaker.
The main problem is that the igniter unit has failed. At least that is what Yamaha call the thing. Everybody else calls it a CDI - Capacitor Discharge Unit. These units are expensive, $1,000.00 from Yamaha but fortunately there are aftermarket ones available form about $400.00. After some urging from Karen, I know have one of these that allow you to manually set the upper rev limit and timing curve. However when I installed it, still no spark. A retest of the pickup coil shows very high resistance and so that needs to be checked.
This job gives me the chance to deal with quite a number of things and really square this bike and some of my equipment away. This afternoon I modified the motorcycle lift to make it work much easier on the VStar, photos to come. With the modified lift in place I removed the left-hand side crankcase cover to have a look at the pickup coil. Glad I did as the gasket was cactus and obviously a cause for the small oil leak that the bike has had for a while. The screws holding in the pickup coil and stator coil are jammed in and some work is required to remove these and replace them with allen key bolts, making the bike much better to work on in the future. I will take the time to clean the crankcase cover nicely and the surrounding area on the bike, it will be a job well worth doing. Loctite Red on the stator and pickup coil bolts and Loctite Blue on the crankcase cover bolts.
Photos to come, I'll keep you'all posted.
HU Queensland 2015, 24, 25 & 26 September 2015
Want travel?
Want motorcycles?
Its all here at Horizons Unlimited ... but its all over for this year. Watch this blog for details on next year's event.


Want motorcycles?
Its all here at Horizons Unlimited ... but its all over for this year. Watch this blog for details on next year's event.


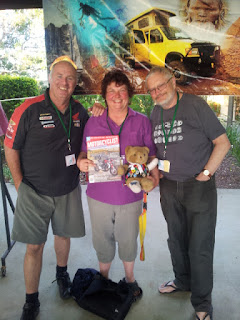
Horizons Unlimited Queensland 2015
Well folks, the annual bash is here again. We start up tomorrow (Thursday) morning with set-up, registrations and check-in starts at 1:00 PM. Again we have a big line-up of presenters but this year we also have workshops and ride-outs. Myself, I will be doing workshops on electrical basics, bearings and DIY modifications, using the DR800 as my prop and demonstration tool. Hopefully I will be able to post photos up as the event progress. Last time I checked we had about 105 on-line pre-registrations, so the numbers are looking good. The venue is "The Outlook" a Queensland Government owned site with camping and dorm-type accommodation as well. Most importantly it has fully set-up conference and options for wet weather. So fingers crossed for an excellent three days of motorcycle travel mayhem.
DIY Stuff: Puncture repair and rear wheel bearings
Today I had a few small jobs to do including fixing a flat tyre. As this involves taking the wheel off, I thought I would try doing the rear wheel bearings and also try doing both jobs using as much as possible the tools and techniques that I would be using if on a trip. A bit of practice should I ever need to do these jobs, or ones like them away from home.
First some preparation. I ordered the replacement bearings and seals from Brisbane Motorcycles at Caboolture. I had tried to order some aftermarket bearings but these were not that easy to source, so OEM it was. I was pretty pleased how that turned out because from what I have read on various forums, the genuine Suzuki bearings are fairly good. To work out which bearings, and a seal, to order, I used the parts breakdown from CMSNL.COM.First step after unpacking was to see if they bearings come with any grease, which they do. However, it really is enough grease to protect the steel whilst in storage and transit and it is wise to pack the bearings with an appropriate waterprrof grease.


So packed them nice and full with Castrol Boating Grease, which I suspect is the same as Belray Motorcycle Waterproof Grease. Looks and feels the same and the information from Castrol is that it is suitable for axles and wheel bearings exposed to water. Taking time to push the grease in and pack as much as possible should help the bearings last. After packing the grease it was back into the packaging and into the freezer. If left long enough this shrinks the races enough to make them small enough to drop in. In this case, after two hours in the freezer, they did not just drop in but neither did they require ay significant force. The front wheel bearings will be in the freezer for several weeks.
These next few pictures show my attempt to do the repair without the bike lift or a centre stand, just like being on the trail. Although instead of a pink plastic box, I may require a rock, a log or try using the cut down walking stick prop stand. Anyhow, the balancing on the side stand trick does work.


In this photo I'm trying to show the important of keeping your axle, washers, spacers and nut together and clean. A friend of mine recently allowed a bunch of dirt on one of the spacers and it ground away.

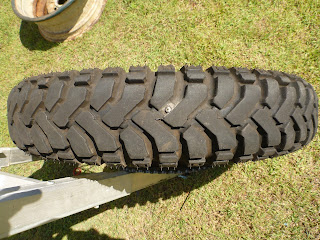
Here you can see the screw that puncture the tyre and tube. Its about an inch, 2.5 centimetres long.
 Both jobs went well and a couple of pertinent points:
1. The "Slime" brand pump was sufficient to pump up the tyre. The exact model pump is now longer available but the equivalent of today's product line-up is the Slime Tyre Inflator. The Slime brand is very affordable.
2. Using the Yamalube tyre lube was a large part of making the bead pop easily. I can't carry that with me on the bike, its a full size 300ml aerosol can. I have ordered a small container of DRC bead cream from bikebiz.com.au and hopefully that is as good.
3. I used the old trick of re-useable cable ties to keep the sprocket carrier to the hub when needed. It really helps. Of course tye sprokect carrier and cush drive rubbers where removed when replacing the bearings.
4. I made a mistake when trying to knock the old bearings out. The easy way is to place the wheel cush drive side down and knock that bearing out by using a lever (in this case a very old screwdriver) from the disk brake side. Once that side is out, turn the wheel over and knock the other side out. I used a 20 cm 1/2 inch socket driver extension as a drift.
5. Be sure to have the correct size drift or socket to bang in the new bearings. No need to have the bearings hard against the spacers. Tighten the axle after putting the wheel back on will bring the bearings in nice and smooth.
6. Plenty of grease where grease is meant to be and everything else shoudl be clean. Grease and dirt can become a form of grinding paste and of course mating surfaces such as between a bearing outer race and a hub are not meant to turn; that will cause premature wear and tear.
So today was a good day. Practice on some old skills, testing out some new techniques and ideas I have tried before which in turn builds my confidence for travelling further afield.
First some preparation. I ordered the replacement bearings and seals from Brisbane Motorcycles at Caboolture. I had tried to order some aftermarket bearings but these were not that easy to source, so OEM it was. I was pretty pleased how that turned out because from what I have read on various forums, the genuine Suzuki bearings are fairly good. To work out which bearings, and a seal, to order, I used the parts breakdown from CMSNL.COM.First step after unpacking was to see if they bearings come with any grease, which they do. However, it really is enough grease to protect the steel whilst in storage and transit and it is wise to pack the bearings with an appropriate waterprrof grease.


So packed them nice and full with Castrol Boating Grease, which I suspect is the same as Belray Motorcycle Waterproof Grease. Looks and feels the same and the information from Castrol is that it is suitable for axles and wheel bearings exposed to water. Taking time to push the grease in and pack as much as possible should help the bearings last. After packing the grease it was back into the packaging and into the freezer. If left long enough this shrinks the races enough to make them small enough to drop in. In this case, after two hours in the freezer, they did not just drop in but neither did they require ay significant force. The front wheel bearings will be in the freezer for several weeks.
These next few pictures show my attempt to do the repair without the bike lift or a centre stand, just like being on the trail. Although instead of a pink plastic box, I may require a rock, a log or try using the cut down walking stick prop stand. Anyhow, the balancing on the side stand trick does work.


In this photo I'm trying to show the important of keeping your axle, washers, spacers and nut together and clean. A friend of mine recently allowed a bunch of dirt on one of the spacers and it ground away.

Here you can see the screw that puncture the tyre and tube. Its about an inch, 2.5 centimetres long.


1. The "Slime" brand pump was sufficient to pump up the tyre. The exact model pump is now longer available but the equivalent of today's product line-up is the Slime Tyre Inflator. The Slime brand is very affordable.
2. Using the Yamalube tyre lube was a large part of making the bead pop easily. I can't carry that with me on the bike, its a full size 300ml aerosol can. I have ordered a small container of DRC bead cream from bikebiz.com.au and hopefully that is as good.
3. I used the old trick of re-useable cable ties to keep the sprocket carrier to the hub when needed. It really helps. Of course tye sprokect carrier and cush drive rubbers where removed when replacing the bearings.
4. I made a mistake when trying to knock the old bearings out. The easy way is to place the wheel cush drive side down and knock that bearing out by using a lever (in this case a very old screwdriver) from the disk brake side. Once that side is out, turn the wheel over and knock the other side out. I used a 20 cm 1/2 inch socket driver extension as a drift.
5. Be sure to have the correct size drift or socket to bang in the new bearings. No need to have the bearings hard against the spacers. Tighten the axle after putting the wheel back on will bring the bearings in nice and smooth.
6. Plenty of grease where grease is meant to be and everything else shoudl be clean. Grease and dirt can become a form of grinding paste and of course mating surfaces such as between a bearing outer race and a hub are not meant to turn; that will cause premature wear and tear.
So today was a good day. Practice on some old skills, testing out some new techniques and ideas I have tried before which in turn builds my confidence for travelling further afield.
Thursday 11 June 2015. Boonah area and Condamine Rover Road Ride with Horizons Unlimited
Its been a while and I note as I type this that I have missed blogging on a few events as well. Hopefully I will get back to these in the next week or so.
On Thursday just gone by, I met up with some guys from Horizons Unlimited South-East-Queensland community and we rode through the Condamine River Road and the are surrounding Boonah. We were lead by David of Plab B Racing. Davis has quite a story to tell and I invite you to have a look at his Facebook page: https://www.facebook.com/planBracingg . A number of creek crossing and plenty of dirt and a little bit of mud. Great day for everyone. The most of the photos below were taken by David and Don:


 Here's a mudmap of the roads and trails we took:
 When all the riding was done, we had lunch at Flavours Cafe in Boonah, an excellent locale to have a hot coffee and bacon and egg breakfast roll, at 2:00 PM! For bikers especially as you can sit on the outside verandah and keep an eye on your bike and equipment as well and enjoy the company.
If you want to join us for a ride, the best way to keep in contact is our facebook page:
https://www.facebook.com/groups/brisbane.horizonscommunity
or via Horizons Unlimited website:
http://www.horizonsunlimited.com/
On Thursday just gone by, I met up with some guys from Horizons Unlimited South-East-Queensland community and we rode through the Condamine River Road and the are surrounding Boonah. We were lead by David of Plab B Racing. Davis has quite a story to tell and I invite you to have a look at his Facebook page: https://www.facebook.com/planBracingg . A number of creek crossing and plenty of dirt and a little bit of mud. Great day for everyone. The most of the photos below were taken by David and Don:


If you want to join us for a ride, the best way to keep in contact is our facebook page:
https://www.facebook.com/groups/brisbane.horizonscommunity
or via Horizons Unlimited website:
http://www.horizonsunlimited.com/
Subscribe to:
Posts (Atom)