After travelling much of Australia but often with not enough time to take everything in, a desire to travel via motorcycle grew. Hopefully these pages can help share some of this enjoyment.
On Saturday a group from Horizons Unlimitee South East Queensland mob net a Toogooloowah and travelled cross country around Crows Nest, Hampton, Plainbyand Emu Creek. We followed a guide provided by the Hampton Visitor Information Centre, 'Drive G'. More on that to follow. I had a small off, did not prepare properly for a creek crossing covered in algae. Nothing serious and my diy extended hand guards worked very well. More in the trip later but for now, a photo of the damage.
Over the last two weeks I've been cleaning up some things on the Suzuki, from lubricating the speedo cable, torquing up the spokes on the wheels, taping up some electricals for better resistance to dirt and dust, valve clearances, valve cover gasket and cleaning up holes and cracks in the beak. To fill the holes I use Permatex 5 minute plastic weld and it works well. However when the paint went on, you can see a few places where I could have sanded the epoxy more, if you look closely enough. No problem, it is a dirt bike after all. Next time though I will use the 30 minute general purpose version. Hopefully if will be a softer covering and a stronger colour, thus easier to evaluate if more sanding prior to paint.
On the mechanical side though, the bike starts with just a touch of the button and idles nicely. Perhaps another horsepower or two has been found. At this stage I don't know but I am sure looking forward to finding out.
Well it finally happened, a centre stand for the DR800 has been sourced, purchased and installed. A company in Germany, Hessler Motorsport, has gone into production of these. Karen agreed to make the my 2016 birthday, anniversary, Father's day and Christmas present for which I am very grateful. Having a centre stand makes routine maintenance so much easier but more importantly, makes repairs on the road easier. Indeed there are some jobs that are very, very difficult without a centre stand.
As many Australians would say: That'll work.
Photos of the installed stand to come as the bike is in pieces at the moment.
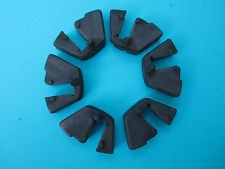
On the rear wheel of most large motorcycles is a cush drive. This is simple a series of interlocking metal lugs and rubber cushions and its absorbs the impact of acceleration and engine braking. Without this absorption, severe jolts are transmitted through the chain or shaft drive to the gear box and this results in premature failure of the chain, shaft drive, sprockets, gears or gearbox. Its fairly important to be running properly.
Unfortunately I haven't given this much thought since owning the bike, some six years now and so now is the time. Servicing quite often involves inspecting and if necessary, replacing the rubbers. The cost involved in replacing the rubbers would be getting close to $100.00 and if they are very worn or have hardened this cannot be avoided.
However, if the rubbers are a little bit worn and have not yet hardened, there is an alternative. Simply shim the rubbers with rubber from a tyre tube. You can use a bicycle tube, a motorcycle tube or a car tyre tube. If fact, if you do this regularly and properly, you can easily prolong the life of the original rubbers dramatically. Here's how this job went:
Whilst the rear wheel is still on the bike test to seen if there is any movement between the sprocket and the rim. In this case, there was a tiny bit.
Remove the rear wheel and separate the sprocket carrier from the hub. If the cushions are still very good this may not be too easy.
Inspect the rubber cushions for hardness and wear. In this case they were still quite soft and a small amount of wear and so therefore good for shimming, no need for replacing. Essentially I followed the idea as per this YouTube clip:
However I would like to point out some differences with what I did. The first is that I used a car tube, which is slightly harder and thicker rubber. This allowed me to cut a single piece that wrapped around the outside left, bottom and right edges with just the one piece per cushion. Just a bit neater and I suspect a bit easier to fit in.
The next difference is that I did use some grease. I have read arguments for and against using grease and had to think this through a bit. I ended up using a slight film on Bendix Brake Grease on all mating surfaces and fairly happy with that decision. Here is my thinking:
I wanted it all to go back together easily and I recall the first time I tried to separate the sprocket carrier from the hub. It was not easy. With the grease, it slid back together firmly but smoothly.
Everything I read suggested that the rubber hardens due to heat. Heat is caused by friction and so anything that safely reduces friction will also reduce heat and prolong the life of the cushions.
Bendix Brake Grease is a high temperature grease and thus will not easily melt and weep out over the wheel and tyre, one of the main arguments for not using grease. It is also very thick and perhaps contribute to the cushion effect; perhaps not though as I used just enough to lubricate the area and it will get squeezed out over time anyhow.
Bendix Brake Grease is used for both metal-to-metal and metal-to-rubber and so is perfect for this application. Increasing the opportunity for parts to move without friction and wear also increases the cushioning effect. One of the arguments against using grease is that many greases contribute to premature failure of rubber parts that have not be designed to come into contact with oil and grease. Bendix Brake Grease is a ceramic based product that does not attack rubber. That is possibly why it is a bit more expensive than many other products.
The grease is very sticky and acted as a mild adhesive, keeping the rubber strips in place whilst I placed the rubbers cushions back in place.
Finally, I have a thick tube of it in my workshop from when I rebuilt the rear brake caliper and so I did not have to go buy something else. That appeals to me greatly.
When it was all back together that small amount of movement was definitely gone and I am fairly certain that I should be able to feel the change whilst riding. We will find out soon enough I guess. For the amount of time about 30 minutes, the minimal cost and potential savings it may offer I think that this is a job that I will do every time I change a rear tyre, which is about twice a year.
As the avid reader (all three of you!) may be aware, I have been doing some work on the DR800. As it is ridden both on and off road and gets used for experimenting new ideas on, it gets a bit of a beating. Purist motorcyclists may consider this to be pure form, as this bike is considered a classic by some and should be treated as such. I don't agree and believe that it should be used however the owner wishes to to. Certainly I do my best to make sure that it is in the best mechanical condition and good to ride but that takes some learning.
Anyhow, I have been reading up wheel maintenance. Things like tightening spokes and the cush drive. Lets start by talking about the wheel spokes as that is all I did on the wheels on Saturday. These need to be kept to a certain tension and that tension needs to be consistent across all spokes. This ensure the ability to transfer the energy of a hard hit on a wheel across the entire wheel, the rim, the spokes and the hub. In turn, this increases the resistance to dings on the rim. The consistent tension also helps prevent broken spokes.
So the next question is, how do you do this job properly. I've seen this done before on TV and read about it but to be sure I watched a number of YouTube clips. Here's one that explains the process fairly clearly:
Some people do this process just using a spoke spanner, hitting the spokes and listening to the sound. I am not confident that is very consistent and several years ago I bought a proper spoke tension wrench. Mine is a Pit Posse brand but there are plenty of others:
Armed with the correct tool, empowered with YouTube knowledge I did the front wheel first and then the rear wheel. The number of spoke that were loose on the front was a surprise and I think I ended up doing about five passes to be sure that everything was nicely tensioned and secure. The most important points of doing this job are:
Be sure to set the tension to the manufacturer's setting.
You do not tighten each spoke one after the other. Start at spoke number 1, next to the valve and then skip two or three and do the next one. Continue in this pattern all the way around and then move to spoke number 2 and proceed in the same fashion. Weather you skip two or three spokes on an individual run depends on the total number of spokes in the wheel. The DR800 has 36 spokes and as 36 can be evenly divided by either 3 or 4, I could have done either option.
Only turn the spoke a maximum of a quarter of a turn each run. If that is not enough to reach tension, then keep doing the process until all spokes reach tension. This may take a while.
Your final run is when all spokes click the tension wrench.
According to everything I have read, the wheels should transmit a more solid feel through the frame and handlebars. I'm not sure I am a good enough rider to actually sense that but I am looking forward to trying it all out.
Whilst working on the headlight I noticed that the front, left hand side indicator was a bit dull. Closer inspection found that the power wire was frayed and so that was a quick re-solder job to repair. Just out of curiousity I compared the current aftermarket indicators to the original, broken indicator. What I found was that the original Suzuki indicator has a small reflector behind the bulb. Nothing flash, just a small amount of lightly polished metal.
A recent tip I had received to improve a headlight's beam was to clean the reflector, so keeping this in mind I thought, why not make my own reflector, can't hurt, right? So with some Permatex Ultra Copper that I had bought and used for the exhaust, a Diet Coke Can, some spring loaded clamps, tin snips and some metal polish I have a new reflector. Yet to do the same for the right hand side or the read indicators yet but will do so. I'm not sure how hot standard bulbs get and if any RTV silicon would work but the Ultra Copper works on very hot surfaces such as the DR800 exhaust, so I know all bases are covered.
I wonder if I use a different can if the aluminium would be more polished to start with? I have an empty Red Bull can on the floor of the 4WD, will it make the bike faster?
The V-Star has been running so well that I have put the DR800 into the shed to do a whole bunch of minor maintenance, including setting right all the wiring for the headlight and indicators. Whilst I had the front end apart I look at the speedo cable and the way it fouled the electrical cabling when turning left. A little research revealed that it did not install it correctly and it had an extra bend in it. So I went about putting the cable right as per the manual and then asked the question, should that cable be cleaned and lubricated?
A 20 minute session searching through Google and well, it turns out that yes, it should be cleaned and lubricated. Failure to do so could destroy the cable and my guess that the replacement cost would range between $40.00 and $200.00. The possibility of damaging the speedo itself crossed my mind as well, although I am not sure if this would actually happen.
Of course the Institute of the Internet and University of Youtube had more theories on the best way to do than the Australian Parliament has on economic growth. The other similarity is that many of them had serious shortcomings. One theory was to just fill the speedo cable from the top with WD40, which of course would leave plenty of dust and rust inside the cable. Another was to take it apart, clean it and lubricate the inner cable with any grease available. I agree with the thorough cleaing but many greases dry out or mix with dust to create a grinding paste.
The final theory, the one I went with, was to clean out both the inner cable as well as the outer layer and then lubricate with with either CRC Dry Glide or WD40 brand Dry PTFE lubricant. I think that both do the same thing, using a Teflon product suspended in a fluid to lubricate the cable. The local hardware store had the WD40 PTFE and so that got the nod.
Cleaned both the cable and sheath with mild degreaser, flushed with WD40 and then very light machine oil and left hanging to dry whilst we went out for an hour. When I wiped down the inner cable with a rag, I was very surprised to see how must dust and rust actually came off. So the need was real, not imagned and I will add this task to the yearly maintenance for all bikes. Sprayed the inner cable and outer sheath with the WD40 Dry PTFE and put it all together. I then spun the cable by hand to compare the resistance before and after and there was a noticeable difference. Very happy with another minor improvement that cost almost nothing. Here are pictures of both products:
As an aside, I do find the WD40 brand products a bit easier to use due to the integrated straw. It makes being accurate with the spray much easier.